 Skip to content

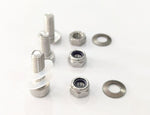

Smart Lever Stainless Steel Fixings
£6.95
Product Description
This set contains all the stainless-steel fixings that attach the composite parts to Smart Lever, plus two Nylon spacer washers for very thick wheel rims. Note: these parts are very unlikely to need replacement unless a part is detached and lost or damaged. Contains
- Stainless steel screw and lock nut for Smart Lever roller.
- Stainless steel screw and lock nut for Smart Lever shoe and thumb press.
- Stainless steel cone washer (placed under Shoe/thumb press lock nut to maintain turning resistance).
- Stainless steel screw and lock nut for Smart Lever removal hook.
- Stainless steel cone washer (placed under removal hook locknut to maintain turning resistance).
- 2x Nylon spacer washers for very thick wheel rims (i.e. thick rim edge).
Delivery & Returns
DELIVERY
- UK Royal Mail 24 (1-3 days): £3.95
- UK Royal Mail 48 (2-4 days): £3.15
- Europe tracked (3-5 days): £9.95
- USA tracked (5-7 days): £9.95
- Rest of world (5-7 days): £10.95
RETURNS
If our instructions are followed, we know you are going to be absolutely delighted with Smart Lever and Bead Lever. But if, for whatever reason, you are not completely happy – we allow 28 days to return unused items for a refund. Just let us know within 14 days of receiving your Smart Lever product that you want to cancel and return your item(s), and you have another 14 days to return them to us. Please see our returns policy HERE.
Instructions
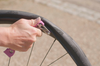
Fit a Tyre
CLICK HERE FOR FULL INSTRUCTIONS
Smart Lever makes it easy to fit tight tyres but you need to know how first because it doesn’t work like any other tool. We strongly recommend the instructions link above as it shows which way you are pushing or moving the tool, which is more difficult to see with videos. Here is a summary:
Place one edge of the tyre, known as the bead, onto the rim - if this proves difficult then use Smart Lever to install the first edge in the same way as described below for the second. If you have an inner tube, pump in just enough air to give it shape, then push the valve through its hole and go around the rim pushing the inner tube over so that it is sitting inside the rim and not between the tyre and outer rim wall.
Now rotate the Smart Lever shoe so it is pointing back away from the long handle (not necessary if your rims are hookless), place the shoe over the rim edge a few spokes back from the valve and swing the handle around until the roller is just below the edge of the tyre. Holding the wheel with one hand, push with the other against the thumb press so that the shoe slides around the rim under the tyre bead (lifting from the inside) - keep the roller under the tyre on the outside and do not apply upward pressure on the tyre edge with the roller at this stage.
If the tyre falls off at the opposite cross over point - simply hold that area with your free hand. When you cannot push further with your thumb, go back around the wheel from Smart Lever around to the opposite tyre cross-over point ensuring that the tyre bead is in the rim’s central channel. You will find you can now advance further with the thumb press. If the tyre cannot be pushed fully on, repeat the above until the installed part of the tyre bead is fully in the central channel of the rim.
If the tyre is still too tight to fully install by pushing forward, the Smart Lever shoe will now be firmly wedged under the tyre bead, allowing you to push the lower part of the handle to lever the tyre up from the outside with the roller. Each time you lever up, the shoe pulls more of the tyre over so you can advance a little further with the thumb press. By repeatedly levering up and pushing forward, it should be possible to fully seat even the tightest tyres.
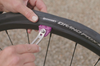
Remove a Tyre
CLICK HERE FOR FULL INSTRUCTIONS
Smart Lever makes it easy to remove tight tyres but you need to know how first because it doesn’t work like any other tool. We strongly recommend the instructions link above as it shows which way you are pushing or moving the tool, which is more difficult to see with videos. Here is a summary:
First, release any remaining air, then try to push the tyre away from the side wall of the wheel rim. In most cases, the tyre edge (known as the bead) will move away without difficulty, but this can be extremely difficult with some tubeless tyres or where the rim has a bead seating rebate. If you cannot move the tyre bead away by hand, then you need Bead Lever Max.
With the tyre bead positioned in the central channel of the rim all the way round and the Smart Lever hook turned in line with the handle, choose a loose section of tyre opposite the valve and carefully hook just under the edge of the bead. Lever just until the tool is horizontal then pull outwards carefully with the short handle, to position the tyre near the rim edge and avoid hooking the tube (if you have one), then lever right down over the edge of the rim.
Now turn the handle at a right angle to the hook, grip the wheel with one hand and push the handle with the other to see if the hook can be pushed along under the tyre for easy removal. If the tyre is too tight, then push the Smart Lever handle firmly in towards the wheel a couple of times and return before pushing forward a little again with the hook flat to the rim side wall. Repeat until the hook moves easily under the tyre, removing all the way round.
If the hook will not move forward, it may be that the inner tube is caught – so pull the hook a little further out from under the tyre and try again.

Bead Lever Max
CLICK HERE FOR FULL INSTRUCTIONS
For previous Bead Lever with purple parts see instructions here and for original Bead Lever that connected to Smart Lever click here.
Bead Lever makes it easy to remove stuck tubeless tyres by detaching the bead from the rim.
The Bead Lever bead breaker tool folds to such a small size that it should fit even in the smallest seat packs.
Slide the bolt up to open wide, place over the tyre with the support on one edge of the rim and the jaw pressing against the tyre on the other, then flip the bolt down and wind clockwise to pull the stuck tyre away from the rim sidewall. For stubborn or narrow tyres - tighten first then lever over sideways on the supported side to separate.